Wednesday, December 7, 2011

Connecting the gas...

When the guy came to install the gas tank he said that we should use the gas in the old tanks and then I can just change over to the new tank when the old tank ran out. It did involve soldering the copper pipes which I thought was the difficult part.

What the gas guy failed to notice was we needed to connect a 1/2' fitting to a 3/4' BSPT fitting. So it was a freezing cold, rainy sunday afternoon when we ran out and I realized I needed a reducing fitting in order to connect up the new gas supply. None of the shops where open and my neighbour Terry didn't have anything to do the job so it was 'boer maak n plan' time.

There was a plug fitting that the installer had left in the pipe to stop dirt getting in. I used this to make a connection on the 3/4 side and turned down a brass fitting off an old braai to connect to the copper pipes and finally got the gas flowing.


Not the neatest solution but it will do till we can get the correct part.

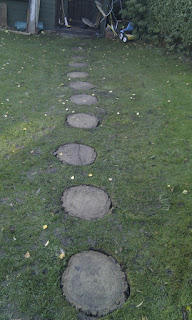
Straighten foot path


The foot path to the shed was

layed out for people carrying

watermelons between their thighs,

you had to zig-zag down to the

shed. So we straightened it

out to make it more usable.


Saturday, November 19, 2011

YouTube video not in email

I have put another video on the blog and I don't think you will be able to get to it via the email you receive. So please go to http://nealsoutter.blogspot.com/ if you would like to see it.

The link to the online blog Station Road can also be found at the bottom of all the emails you receive.

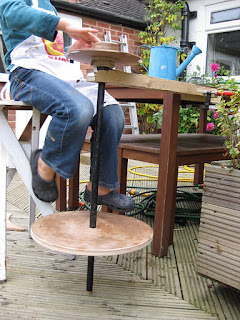
Liam using Potters wheel

I finally finished making the potters wheel today! Liam and Ispent some time this afternoon making more clay from the clay we dug out the front lawn. Then Liam made a few bowls on the wheel.


Since this picture was taken we have added a lot of lead (from the flashing on the chimney we took down) to the underside of the foot wheel to give it some weight.


Take a look at the video on YouTube.

Friday, November 11, 2011

Clay, clay and more clay.....

Considering we have so much clay, we decided to try and make something out of the clay. Liam and I spent time at the end of the day soaking some of the clay we dug out the ground and getting it into a usable state.


We then made a bowl each, as you can see they are beautiful works of art ;-)

Gas Tank arrived


The 2400 litre gas tank arrived today and was installed by a really nice guy!


Alison and I spent the afternoon filling in the trench. Tomorrow we have to tackle the hole!!!

Thursday, November 10, 2011

Lead-go


We got talking about melting lead at the dinner table for some reason so the boys asked if we could try. We had some lead flashing from the chimney we took down but didn't know what to cast.


We finally ended up trying to make a lead lego piece but it didn't work too well. Perhaps we will try again sometime.

Hole in lawn


Some pictures of our 'poor' front garden. The trench goes all the way to the house and is 750mm deep. The main hole is 1.6m deep and more than 3m x 2m. It is huge!!! You can just see the little dumper in this top picture which they took away a bunch of soil / clay in. Else there woundn't have been enough space on the lawn.

The boys loved playing in the clay / mud, but it stressed Alison a bit.

The gas tank arrives tomorrow......hopefully!

Saturday, November 5, 2011

Loft insulation (air filters)

I spent a long time in the loft moving the air filters that were in one big pile and spreading them out over the passage and boys room. I figure they can't hurt as an extra layer of insulation. They are two deep and packed in nice and tight as you can see in the picture.

Boys floor


We decided to take a look at the damp issue at the front wall of the boys room. When I lifted the chipboard replacement floor boards the previous bloke had used (they are like cheap loft board and will fall apart with the first sniff of moisture) I found they had put plastic under the them, I am guessing they did this to stop the chipboard getting wet. The wall on the left is full of mildew all the way up to about 2 metres high. When we bought the house a company came in and told us we had rising damp but with a bit of research we found it is probably not that at all, it seems to be condensation causing all the damp problems.


In this picture you can see the water dripping off the bottom of the plastic it was so wet.


We cleaned out the only air brick into the floor in boys room and I installed two computer fans (in a block of pink insulation) on a spare car battery so now it runs all the time under the floor moving out the damp air and it seems to be working. When ever we open the floor it is never dripping wet, but we need to insulate the out side walls in order to stop the condensation forming in the first place!


Thursday, November 3, 2011

Zip wire (foofy slide)


I built a zip wire for the kids. After seeing it at Wayne's house they nagged me enough to get me to make one. It needs a few safety features added so it doesn't fall off the line and knock the kids out :-)


Sunday, October 30, 2011

Hi All, I have just redone the pictures in the last two posts as they were no showing. You will have to go to the on-line version of the blog to see the pictures. This is the link http://nealsoutter.blogspot.com/
If you have any problems please email me,

Neal.

Friday, October 28, 2011

You were right Dad (Leicher) :-)


Glue guns don't work for attaching cables to the wall, maybe next time I will listen to you :-)

Organising workshop (shed)


With Liam's help we made places for almost all my power tools and nail gun on the wall, so now they all have a place and can be packed away quickly. In the middle is a shelf for the screw boxes. And we also extended the clamps rack.


I made a shelf on the ceiling for the spray paint cans and under it are the silicon tubes etc. Each tube is clipped into a piece of PVC waste pipe, it was an idea from the storage magazine Dad (Soutter) gave me a few years back and it works really well.


Chicken coop artwork


Alison, Liam & Zac have been decorating the chicken coop, they have done more than in this picture so there will be more updates to follow.

The table has legs....


I got the new (old) legs on the table! As you can see I still have some bits of the recesses to strip of the old stain. I am not sure how we are going to finish it, any ideas are welcome.


Posted by Picasa

Monday, October 24, 2011

Busy weekend at 78 Station Rd!

We had great weather this weekend and got lots done! Alison started painting the hen house.
Liam and I (with a little help from Zac) tackled an old tree stump in the front lawn.


During the week I finally got around to buying the wood for the huge fence panel I needed to build. So there was no excuses and with the aid of a few power tools and my nail gun (thanks Dad!) I put it together rather quickly.

This is the only photo I took of the finished product and the 'nice' side is facing my neighbours. But this gives you a good idea of what it looks like.


I also got around to spray painting more of Liams bike as the black bits where looking very tatty and needed a bit of TLC.

And the final project of the weekend was replacing the legs on the dinning room table, the current legs don't allow a person to sit at either end when it is in it small form. So I have finally found a use for the four table legs salvager from the skip outside Britvic many years back.

Posted by Picasa

Monday, October 10, 2011

Re-tiling roof

Today, inspired by Waynes 'Just do it' enthusiasm, I stripped tiles out of the out-house roof and used them to close the hole.

This is how Wayne and I left the hole in case it rained.


Wayne and I had already cut wood into strips and re battened the chimney hole.


So all I had to do was put the tiles in, it is kind of like a game of Tetris getting them to fit.


I then retiled the outhouse where I had scavenged the tiles from, I used tiles but the only problem was they were carpet tiles :-) The back of them does seem to be very waterproof. I am thinking of sending the picture to the tiles manufacturer and asking them if I have installed them correctly!


Posted by Picasa

Sunday, October 9, 2011

Coop design

 
This was the Sketchup design I did that we built the chicken coop from.
Posted by Picasa

Taking down the chimney

When I mentioned the chimney Wayne said, "Lets do it!". So we put pieces of plywood on the neighbours roof supported on foam blocks, we then covered with a carpet and tarp so that nothing would damage his roof.


Wayne then dismanteled the chimney brick by brick


I then had to take the bricks in a bucket down the roof and onto the flat section, and from there I could throw them to the ground. Alison and Liam helped by pilling up the bricks and junk that I threw down.


We got further than this photo shows but this was the last photo we took.
 
Posted by Picasa